NextGen Office New Self Patient Registration
Administration: New Patient Self Registration and Scheduling
Personalized provider web pages are a great way to build the practice and market it to potential patients. Use the New Patient Self Registration and Scheduling feature to create a provider page with an online schedule and have it published and hosted by the YourHealthFile Patient Portal. New patients can use this web page to self-register for the practice and schedule their first appointment without ever calling the office. Each practice provider can create a page and customize its content using the easy-to-use graphical template.
- Create a provider page per location and calendar resource (provider).
- Provider pages are mobile-friendly. Patients can open the pages on a mobile device.
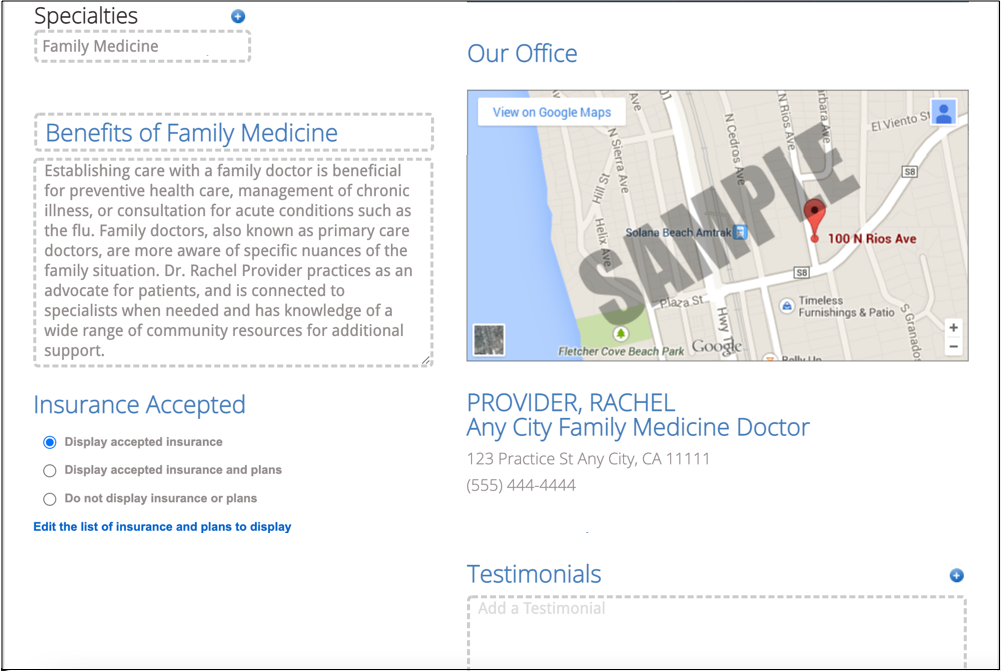
Provider pages include the following fields and headings:
- Practice name and specialty
- Calendar of available appointment times
- Practice information
- Location address and map
- Testimonials (optional)
- Accepted payers and plans (optional)
Embed Provider Page URL within the Practice's Website
Work with your website developer to add these URLs within the website so that a patient can open the provider's web page.
Requirements
- New Patient Self Registration and Scheduling is a premium Patient Portal feature. Contact your Sales representative to subscribe.
- Enable Advanced Appointment Features in Administration: Enable and Disable Features.
- Set up calendars to appear on the Patient Portal in Administration: Portal Calendar Management.
Open Administration: New Patient Self Registration and Scheduling
- In PM, click Admin.
- Below Premium Portal Management, click New Patient Self Registration and Scheduling.
Provider Page List
|
Status |
Description |
|
Active |
Published pages show a URL in the Provider Page URL column. Embed this link within your practice's website. |
|
In Progress |
Pages not yet published (saved as draft) |
|
Archived |
Archived pages |
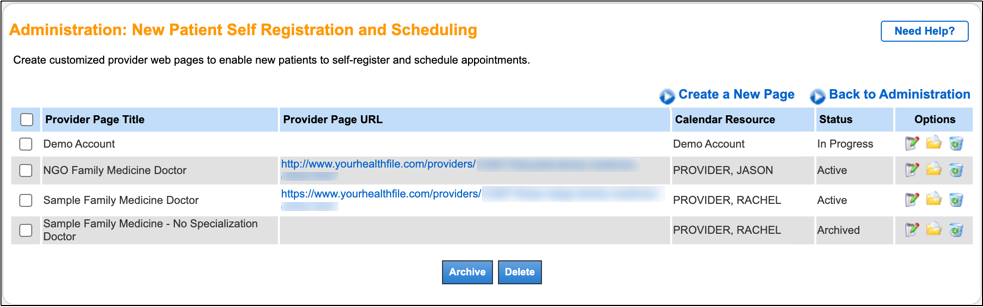
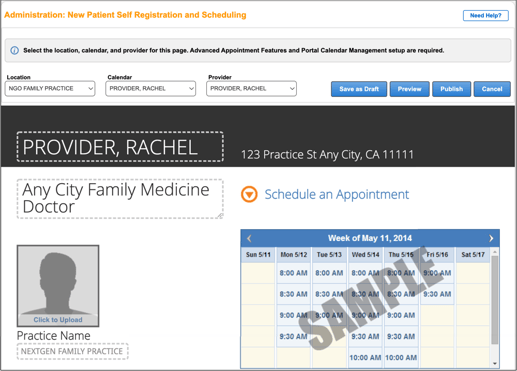
Create a New Page
Select the Location, Calendar, and Provider to pre-populate the Provider Name, Office Address, Page Title, and Specialty.
- Click Create a New Page.
- Select the Location, Calendar, and Provider.
- Location:The address pre-populates next to Provider Name. The address and phone number pre-populates the Office Address The location's city pre-populates in the Page Title field along with the first text field within the Specialties heading, only if both are filled.
- Calendar:Preselects a matching provider if one exists. The calendar schedule appears within the published page.
- Provider:Pre-populates the Provider Name and Specialties The provider's name and the address pre-populates within the Our Office subheading.
- Review the pre-populated fields and headings, and edit as necessary.
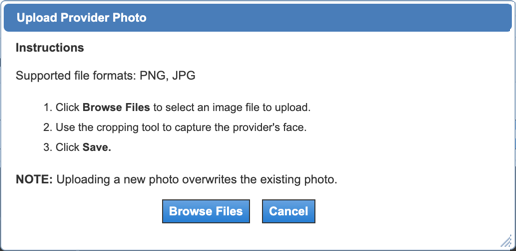
Upload Provider Photo
Supported file formats: PNG, JPG
Photo height and width are cropped at 160 px. Uploading a new photo overwrites the existing photo.
- Click the photo upload box.
- Click Browse Files to select an image file to upload.
- Use the cropping tool to capture the provider's face.
- Click Save.

Benefits of
Type the description of the provider's specialty.
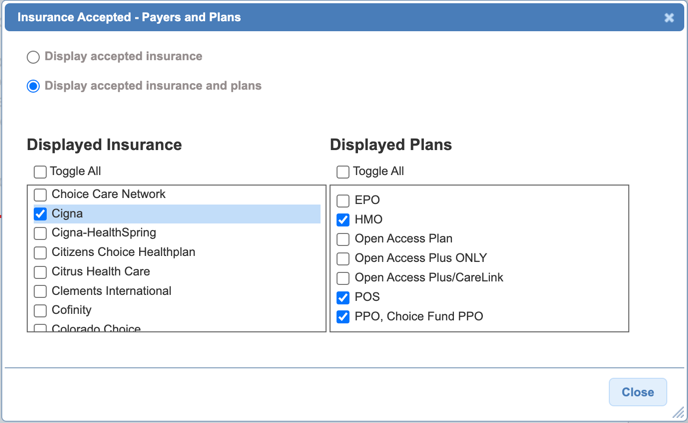
Insurance Accepted (Optional)
- Select one of the Insurance Accepted options.
- Display accepted insurance:Selected by default. If you keep this option, click Edit the list of insurance and plans to open the Insurance Accepted - Payers and Plans
- Display accepted insurance and plans: Opens the Insurance Accepted - Payers and Plans
- Do not display insurance or plans: No insurance payers or plans will appear on the provider page.
- Select the insurance payers or payers and plans.
- Click Close.
Testimonials (Optional)
Type the testimonials that you have received from patients.
Save as Draft, Preview, or Publish
Click one of the following options:
- Save as Draft: Save the page as a draft or publish this page at another time.
- Preview: Open a page preview without publishing. To publish the page from the preview, click Edit to exit the preview and click Publish.
- Publish: Publish the page.
Overview of Fields and Headings
|
Field/Heading |
Content Derives from |
Description |
Editable |
|
Provider Name |
Administration: Provider Maintenance |
Pre-populated by the Provider menu selection. |
Yes |
|
Address next to Provider Name |
Administration: Locations |
Pre-populated by the Location menu selection. |
No |
|
Page Title |
Administration: Locations and Taxonomy in Administration: Provider Maintenance |
A combination of multiple items pre-populates in this field:
Sets the subtitle below the provider name under the Our Office subheading. |
Yes |
|
Practice Name |
Practice in context |
The practice in context pre-populates this field. |
Yes |
|
Photo upload |
Manually uploaded |
The provider's photo appears on the provider page. |
Yes |
|
Specialties |
Taxonomy in Administration: Provider Maintenance |
Entering data in this field initiates the following actions:
|
Yes |
|
Benefits of |
Taxonomy from Administration: Provider Maintenance is filled in after "Benefits of." |
Explain the value of the provider’s specialty to market the provider to new patients and describe the provider’s specialty in detail.
|
|
|
Our Office |
Administration: Locations |
The Provider menu selection pre-populates the provider's name and the address within the Our Office subheading. |
No |
|
Insurance Accepted (optional) |
Manually selected |
The practice's accepted insurance payers or plans appear on the provider page. |
Yes |
|
Testimonials (optional) |
Manually entered |
Testimonials that you have received from patients. |
Yes |

Call MPM today to schedule a Demo at 973-256-1998 x2
